
| Important |
|
To create a new sale, please follow these steps:
- Once you are logged in your account, click on Partner Portal.
- On the left menu, click on Sales management.
Note. All sales (from your own organization and child organizations) will be listed in a new screen.
- Click on the Register new sale button.

- Search a reseller or create a new organization (the organization that the sale is aimed for). Notes:
-
- If you enter more than three characters in the search box, the system will display the entries that coincide with your search. Then, click on the child organization.
- Customer Category cannot be modified.
- If it is necessary, create a new contact or new user to that organization.
- Click on the Next steps button to continue the process:
A. Create the product distribution. Fill all fields:
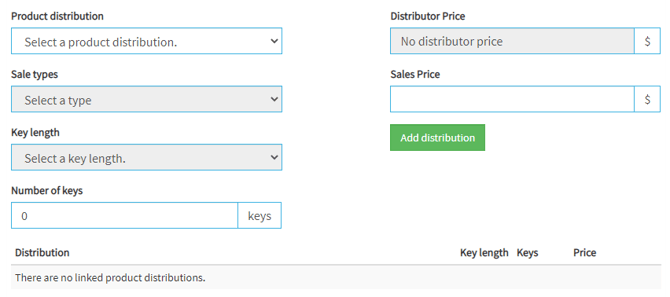
- Product distribution. You can choose between different distributions:
-
- IT PRO: includes all vendors of the chosen product type.
- MOS eLearning: includes the Microsoft Office Specialist eLearning (Note. The MOS Practice Tests are included in IT PRO product distribution).
- Demo: includes all demo products.
- Mindhub IT PRO: Practice Test, Practice Test VMWare and PMP or Practice Test CISCO.
- Used Generated Content: includes all products created for the own organization.
Note. In a sale you only can include a product type (a practice test type or an assessment type). For example, if you include an IT PRO practice test, you cannot include a MOS e learning practice test. If you need both practice tests, you must create two different sales.
- Distribution Price. This price is calculated automatically, considering the discount percentage applied as a distributor.
Note. In Account, the organization info page has a field to set the distributor discount. It is the discount percentage that will be applied to the sales created for them. If this field has a value higher than zero, the organization is considered a distributor.
- Sale types. Depending on the Product distribution chosen, some Sale types may be disabled.
- Sales Price. The sales price is calculated considering the product distribution, the sales type, the key length, and the number of keys. In addition, this sales price depends on the category organization.
Note. The sales price can be changed manually. Note that, if it is set higher than the default, the distributor price is updated according to the distributor discount. If it is set lower than the default, the distributor price stays the same.
- Key length. Choose how long you want the key to remain active once registered.
- Number of keys. Each bundle can have any number of keys between the number of that bundle and the number of the next bundle. You can update the bundles up to the next limit, by choosing any number you want. So, you can for example choose bundle 10, and, then in the quantity field you can update any number up to 99 or if you choose 100, you can update the number by any number up to 249, etc. This works for all the bundles in the same fashion.
Note. The limit for Bundle 1000 is 100000. Per key bundle has no limit.
Click on the Add distribution button.
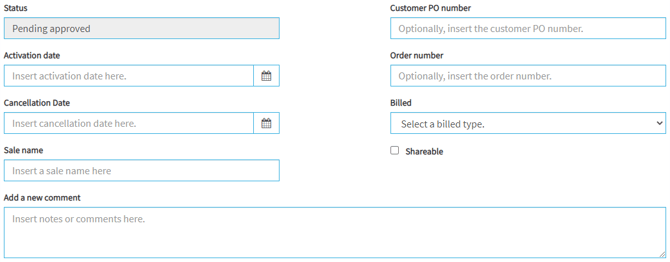
B. Set up the product distribution. Fill all fields:
-
- Status. When you create a new sale, it will be Pending Approval. In order to use the sale, it needs to be approved. When a sale is approved, an email is sent to the user that created the sale to let to use it.
- Customer PO number. If you want, you can insert the customer PO number.
- Activation date. The date when the license starts to be active and the organization can create keys.
- Order number. Optionally, you can insert an order number.
- Cancellation date. By default, it is 365 days after the Activation date. However, you can advance this date.
- Billed. This data is significant for reports. You must select an item in the list:
- Billed in Portal. The sale has been billed.
- Billed in Provusion (only some partners use this option).
- Not billed. The sale has not been billed.
- Sale name. Now, it's a required field and will show up on the customer catalog in their portal.
- Shareable. Check this item if you want to share the license with a child organization.
- Add a new comment. If you wish, you can type a comment to this sale.
- Finally, click on the Create new sale button. Then, you will need to wait for the sale approval.
What would you like to do next?
- Do you want to create a user? Click here for more info.
- Do you want to import users? Click here for more info.
- Do you want to order a key? Click here for more info.
- Do you want to see a report? Click here for more info.