
Access to My Account by clicking on Tools > My Account.
This section displays the list of users that belong to your organization as well as those that are in organizations under yours.
To create a new user:
Video
Steps
- Click on Users.
- Click on + New User.
- The following window opens:

To assign a role within an organization of your choice, you can use the search bar (by clicking on the arrow) and enter the name of the new organization. Or you can click on the arrow and scroll down until you find the name of the organization. - Once you have completed all the fields, click Save Changes to save your entry.
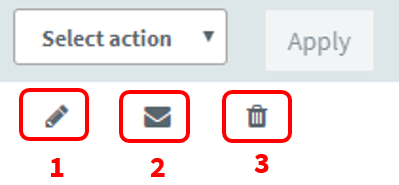
Then, the new user will be added to the Pending Users tab. On this tab you can:
- Edit (1) the user information.
- Resend (2) the validation email to pending users.
- Delete (3) the user.
Note. You can also modify several pending users at the same time. Check the users to select them and use the Select action dropdown to send the validation email or to delete them all.
Once the user has been created, an email will be sent automatically to this new user to validate the account and set the password. Please, note that the user must complete three actions:
- Click on Account validation.
- Add and confirm a Password.
- Read and accept the Privacy Statements
If you have marked the Notify me by email when a guest user registers option, you will receive a notification once the user validates the account. Please, review the How to set up your account post for more info.
Once the account has been validated, the user will appear in the Users tab, and will be able to access their Learning Locker.
What would you like to do next?
- Do you want to import users? Click here for more info.
- Do you want to order keys? Click here for more info.
- Do you want to create a group? Click here for more info.
- Do you want to create a new sale? Click here for more info.